
Crafted in Europe, Shipped Worldwide
How Hand Painted Catholic Icons Are Created: A Step-by-Step Guide to Egg Tempera

For centuries, sacred art has served as a visual bridge between the earthly and the divine. Among the most revered traditions in Christian history is the creation of authentic, liturgical imagery. For a true iconographer, crafting these holy images is not merely an artistic endeavor—it is a rigorous spiritual discipline, a profound theological statement, and a masterclass in ancient craftsmanship.
If you are looking to enrich your home or chapel with hand painted catholic icons, understanding the traditional sacred art process reveals why these sacred objects are considered timeless treasures of faith. Operating from a dedicated workshop in Poland, near the majestic Beskid Mountains, I follow the strict, historical guidelines of Christian iconography.
Here is the exclusive, comprehensive, 7-step sacred process behind creating museum-quality, traditional egg tempera icons for the global faithful.
Step 1: Selecting the Premium Wood for Hand Painted Catholic Icons
An authentic icon never begins with paint; it begins with prayer. As an iconographer, I enter the workshop with a quiet mind and a focused heart. Iconography is often referred to as “writing an icon” because every brushstroke proclaims the Gospel in color and form. Therefore, spiritual preparation is essential to align the artist’s hands with divine grace.
Simultaneously, the physical foundation must be flawlessly prepared. When sourcing the materials, I focus exclusively on premium custom wooden icon boards. The choice of wood is critical. I source seasoned timber panels from local master carpenters in the Beskid region of Poland.
- The Best Woods: Linden (lime wood) and beech are preferred for their stability and fine grain.
- Woods to Avoid: Coniferous woods (like pine or spruce) are strictly avoided because they contain natural resins that will eventually seep through and ruin the artwork.
To prevent the wood from warping or bending over time due to humidity changes, the back of each board is reinforced with oak braces called szpongi (cross-slats). The front of the panel can either be flat or feature a traditional raised border creating a recessed central area called the kovcheg (ark), which symbolically protects the sacred image within.
Step 2: Preparing Custom Wooden Icon Boards with 12 Layers of Traditional Gesso
Once the wood panel is selected, the front surface must be prepared to receive the pigment. This process is called priming or applying gesso (levkas).
Traditional gesso is a meticulous mixture of high-quality animal-skin glue and natural chalk (such as Champagne chalk, Bologna chalk, or specialized gilding chalk). These materials provide the necessary calcium carbonate base.
- A piece of open-weave linen cloth is glued to the board to act as a stabilizing matrix.
- Approximately 12 thin layers of warm gesso are meticulously brushed onto the panel.
- This step is best executed during the summer months, as every single layer must dry completely before the next one is applied.
Once all 12 layers have cured, the surface is rigorously sanded by hand using progressively finer sandpaper. The goal is to achieve a surface as smooth, white, and flawless as polished marble.
Step 3: The Sacred Sketch (Podlinnik) and Levkas Toning
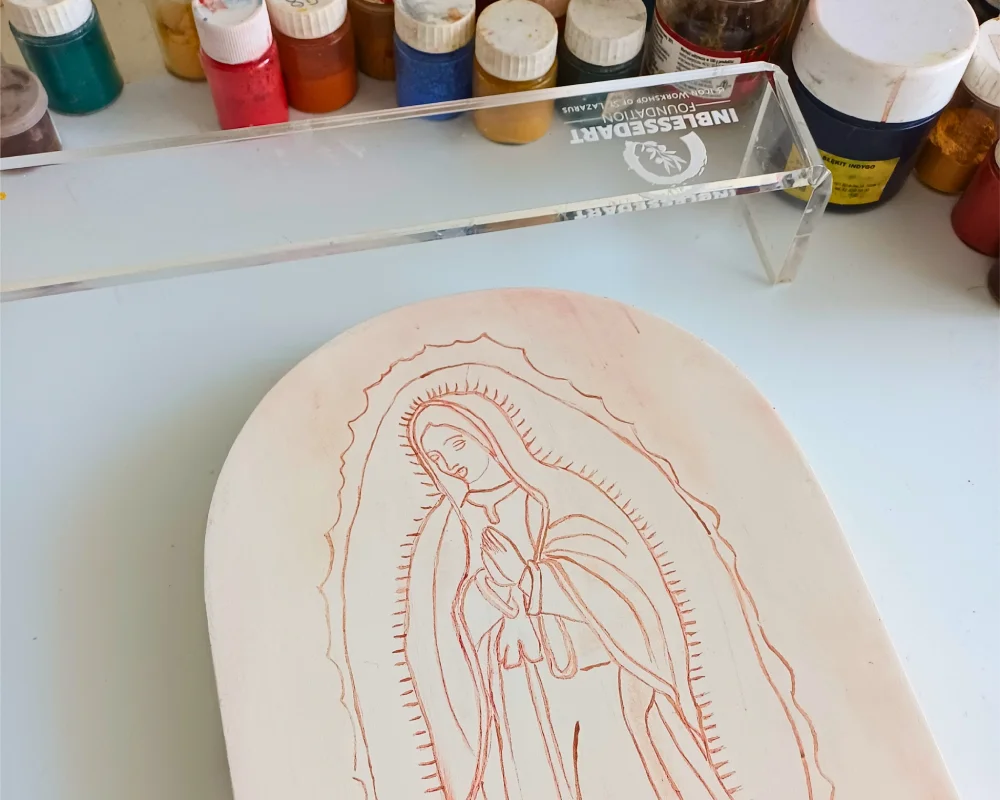
With the pristine white board ready, the iconographer introduces the holy image. This is done using a podlinnik—a traditional iconographic sketch or pattern book that preserves correct theological geometry. While creative artists can sketch the icon freehand (which yields magnificent, unique results), relying on established historical proportions ensures canonical accuracy. When transferring or drawing the image, the placement of the eyes, nose, and mouth is of paramount importance.
To transfer the podlinnik, the back of the sketch paper is dusted with a dry pigment powder. The paper is taped to the board, and the contours are traced with a stylus, acting as a historical carbon-copy method. Once the faint outline appears on the smooth gesso, it is reinforced with a very fine brush using a thin wash of egg tempera medium.
Next comes an essential step known as “extinguishing the levkas” (gaszenie levkasu). I apply a light wash of yellow ochre pigment mixed with the tempera medium over the entire board, painting in a crosshatch pattern one or two times. This eliminates the blinding brightness of the white gesso, giving the board a warm, cohesive undertone.
Step 4: The Ancient Art of Gold Leaf Gilding on Clay Bole
Before a single drop of colorful paint is applied to the holy faces, the background must undergo the meticulous process of gold leaf gilding to represent the uncreated, heavenly light of God.
This process utilizes the traditional water gilding on bole method:
- Bole Application: Several layers of a liquefied clay mixture called pulment (bole) are applied to the areas intended for gold. While yellow or black boles exist, a deep red clay bole is traditionally chosen to give the gold a rich, warm, and majestic undertone.
- Activation: The dried clay is activated by brushing it with a mixture of water and alcohol (traditionally vodka).
- Gold Application: Using a specialized squirrel-hair brush (a gilder’s tip), delicate leaves of genuine gold leaf are transferred onto the wet surface. The liquid instantly draws the gold down, bonding it to the clay.
While some artists burnish the gold with an agate stone to achieve a mirror-like sheen, I am a firm believer in a soft, satin-matte finish. A highly reflective, mirror-like gold surface causes the viewer’s own face to reflect in the icon, which distracts from the prayerful experience. A satin finish glows softly, scattering the light beautifully in low-lit environments.
Step 5: How We Paint Authentic Catholic Icons Using Egg Tempera
Now, the true painting begins using the ancient method of egg tempera. This medium consists of pure, dry mineral pigments bound with a fresh egg yolk and a touch of water or organic acid. It is an archival, incredibly durable medium that does not yellow with age.
I begin the painting process by executing the flesh tones—the face, hands, neck, and feet. While some traditions dictate starting with the garments, focusing on the flesh tones first establishes the spiritual presence and gaze of the holy figure. Afterward, the backgrounds and geometric drapes of the garments are meticulously filled in.
Once the garments are complete, fine ornamental details—such as the gold stars on the robes of the Virgin Mary or radiating divine rays on depictions like Our Lady of Guadalupe or Christ (klav)—are added using a technique called assist gilding. For this, I use a specialized oil-based mixtion size. The painted area is dusted lightly with talcum powder so the gold won’t stick where it shouldn’t. The intricate patterns are drawn with a tiny brush using the size, and genuine gold leaf is gently pressed onto the tacky lines. The excess gold is then swept away with a soft brush.
Finally, the icon is named. Writing the holy name (e.g., St. Rita, Sanctus Joannes) with canonical symbols cements the identity of the saint and completes the painting phase.
Step 6: Curing, Varnishing, and Color Enhancing
Once the inscription is painted, the icon must rest. The egg tempera layers and natural pigments require a minimum of 3 months to fully cure, stabilize, and chemically harden.
After this crucial waiting period, the icon is dusted off to prepare for varnishing:
- I gently warm a specialized, hard-drying oil (such as traditional olifa or technical drying oil) in a hot water bath.
- The painted surface of the icon is carefully warmed using a hairdryer to open up the microscopic pores of the tempera.
- I apply 2 to 3 thin layers of the warm oil, allowing ample drying time between each application.
This varnishing process acts like magic; it penetrates the mineral pigments, instantly darkening and deepening the tones. The colors become incredibly vibrant, rich, and saturated, while the surface gains a permanent, robust shield against dust and environmental moisture. At this stage, the sides and back of the wooden panel are stained with a rich wood stain or sealed with a protective varnish to finish the look.
Step 7: Handing Over the Icon and the Tradition of Blessing
Once the varnish is dry, the icon is complete and ready for its new home. However, there is a strict, traditional rule in iconography that I faithfully observe: an iconographer never sells hand painted catholic icons that have already been blessed.
Simony—the buying or selling of spiritual things, including blessings—is forbidden. Therefore, all my works are shipped as sacred art pieces, unblessed. It is the joy and responsibility of the new owner to take their hand-painted icon to their local parish priest. The priest will then recite the traditional prayers of dedication and bless the icon, transforming it from a beautiful piece of religious art into a sacred sacramental object of devotion.
Safety Note: The entire sacred art process requires immense precision and care. Once you receive your traditional egg tempera icons, it is vital to protect the delicate surface. Natural skin oils can affect both the painting and the authentic gold leaf gilding. Always handle these hand painted catholic icons using clean, white cotton gloves, and ensure your fingernails are trimmed short to prevent accidental scratches to the masterpiece crafted on our custom wooden icon boards.
Explore the deep beauty of historical sacred art by viewing my step-by-step workshop images in our Iconography Portfolio. If you feel called to bring a custom, museum-grade holy image into your prayer life, visit our online boutique to commission your piece today.
FAQ:
Q: How do I care for my hand-painted egg tempera icon?
A: Always handle your icon with clean cotton gloves, as bare fingers can transfer oils to the delicate surface. Display the icon away from direct sunlight, extreme humidity, and open candle flames. To clean it, simply dust the surface gently with a completely dry, ultra-soft microfiber brush.
Q: Why are your hand painted catholic icons not blessed before shipping?
A: According to Catholic tradition and Canon Law, selling a pre-blessed spiritual item is improper (associated with simony). To respect the sanctity of the blessing, the icon is sold as a sacred artwork, allowing you to build a personal connection with your local priest by asking him to bless it for your home.
Q: Can I order a custom saint or a specific size?
A: Yes. Because every wooden board is custom-carved from seasoned Beskid timber, egg tempera icons from Iconoria Studio can be crafted to your exact dimensions, featuring the specific Catholic saint or biblical scene your devotion requires.
Q: How long does the entire sacred art process take for a traditional egg tempera icon?
A: It takes around 3 months. This timeline ensures each of the 12 gesso layers dries perfectly, the egg tempera painting stabilizes, and the icon cures completely before the final protective varnish is applied.